Blendspace! Have you tried it yet? I went to a technology conference back in January or February and learned about several cool websites, but the one I was most excited about was Blendspace.
What is it? Simply put, Blendspace is an online resource that allows you (the teacher) to put a variety of resoures (videos, webpages, pictures, documents, etc.) into one place for students. You can even create online quizzes on Blendspace, so after students complete the interative lesson boards you set up for them, they can complete a short quiz so you can easily assess their understanding.
How can you use Blendspace in the classroom? In several different ways....
1. In a Flipped Classroom
2. In a small group where there's no teacher leading the group
3. Independent research with safe approved resources
4. (I hope to do use it in this way this year) Have students do extension projects and create their own Blendspace boards.
Since our school system is going google, I will be able to more effectively use Blendspace this year. I hope to blog again in a few months with more tips & tricks for using Blendspace then, but for now, here are some of the basics!
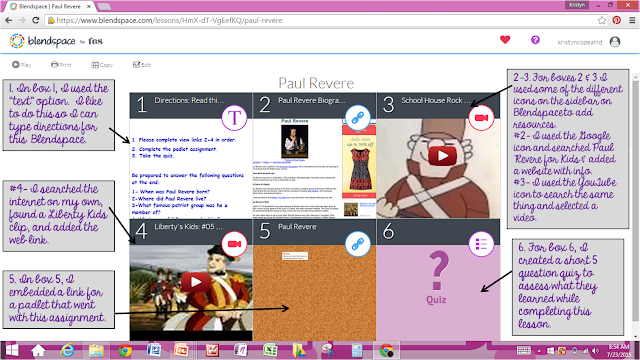
For starters, here is one of my most recent boards that I've made on Blendspace to give you an idea of what it even looks like.

Here's a brief tutorial I found on YouTube that shows the basics of Blendspace--how to use it and how to make your own.
1. Box 1: Text
For box 1, I chose the text option. I like to do this so I can list out directions for the entire Blendspace. I also go ahead a list some of the questions that will be on their quiz at the end to help them know specifically some of the information they are looking for.
2. Box 2: YouTube video.
For box 2, I chose to use a YouTube video. I used the YouTube icon on the right to search "Minerals for Kids," selected & previewed a video, and then drug it over to box #2. I like to start with a video because I feel these get their attentions quickly.
3. Box 3: Google search for website.
For box #3, I used the Google icon on the right to search "Minerals for Kids" and selected "web" to search for information rather than images. I found a website with good information that I liked, clicked the link, and drug it to box #3.
4. Box 4: Website
For box #4, I used the website icon on the right to enter a link for a website I already knew that I wanted to use. Just copy & paste the link, hit enter, and then drag it to the box!
5. Box 5: Padlet
Padlet! Oh, how I love Padlet! I'm planning to do my next Technology Tidbit on padlet. In short, it's kind of like a virtual corkboard that is great for collaboration, discussion, and SO much more! So, I created a padlet (in like 30 seconds!), got the code for that board, and used the website icon on blendspace again to upload it. I used this padlet for students to just simply state one thing they learned about minerals. That way they can post something, and get to read what other students posted at the same time! Again, that should be my next tech post!
6. Box 6: Quiz time!
Last but not least, I created a quiz at the end. It was just a few simple multiple choice questions. It gives immediate feedback too!
Just type the question and answers, and then select the correct answer. Do this until you are done creating all the questions you want and hit submit.
Lastly- once I'm done making my Blendspace, I choose how I want to share it with my kids. There are several different options: sending a link, Edmodo, Twitter, embedding a code, email, Facebook, or my personal favorite- QR Code. Teaching elementary and having several iPad minis in my room, I LOVE QR Codes. I use the QR code for my blendspace, copy it into a word document, and print a couple out for my kids to use to quickly take them to the site!
Finished Product:
Here's my finished product & what my students see once they hit play! (This is the Paul Revere one shown at the beginning of this post.) The link to this Blendspace is below the image as well in case you want to see it in action! :)
Kristyn


No comments:
Post a Comment