Visit my TpT store to download your free copy of today's FREEBIE! Be sure to follow my store while you're there to see what today's DOLLAR DEALS are!!!
Visit my TpT store to download your free copy of my Burlap & Black Alphabet Posters! Be sure to follow my store while you're there to see what today's DOLLAR DEALS are!!!
Visit my TpT store to download your free copy of my Burlap & Black Alphabet Posters! Be sure to follow my store while you're there to see what today's DOLLAR DEALS are!!!
I'm celebrating the last few days of summer with a Christmas in July sale!!! Everyday (Tuesday, July 28 - Friday, July 31) I will be having different sales! Follow my blog & my Facebook Page: Copeland's Got Class to watch daily for my daily FREEBIE!!! Follow my TpT Store for each day's DOLLAR DEALS!!!
My store will be on sale for this whole duration. Each day will have a Daily Freebie & different Dollar Deals! In order to be able to each day's daily deals, follow me here, on Facebook, and be sure to follow me on Teacher's Pay Teachers! ***BONUS: All my followers on TpT get a monthly newsletter with a Follower's Only Freebie. My next newsletter is coming out August 1st! You don't want to miss it! :)
Christmas in July starts TOMORROW-- Tuesday, July 28th! Check back then for that day's deals!
Blendspace! Have you tried it yet? I went to a technology conference back in January or February and learned about several cool websites, but the one I was most excited about was Blendspace.
What is it? Simply put, Blendspace is an online resource that allows you (the teacher) to put a variety of resoures (videos, webpages, pictures, documents, etc.) into one place for students. You can even create online quizzes on Blendspace, so after students complete the interative lesson boards you set up for them, they can complete a short quiz so you can easily assess their understanding.
How can you use Blendspace in the classroom? In several different ways....
1. In a Flipped Classroom
2. In a small group where there's no teacher leading the group
3. Independent research with safe approved resources
4. (I hope to do use it in this way this year) Have students do extension projects and create their own Blendspace boards.
Since our school system is going google, I will be able to more effectively use Blendspace this year. I hope to blog again in a few months with more tips & tricks for using Blendspace then, but for now, here are some of the basics!
For starters, here is one of my most recent boards that I've made on Blendspace to give you an idea of what it even looks like.
Here's a brief tutorial I found on YouTube that shows the basics of Blendspace--how to use it and how to make your own.
After watching that, here's a breakdown of how I created one or my boards and why I set it up the way I did. (This is a board I created all about minerals.)
1. Box 1: Text
For box 1, I chose the text option. I like to do this so I can list out directions for the entire Blendspace. I also go ahead a list some of the questions that will be on their quiz at the end to help them know specifically some of the information they are looking for.
2. Box 2: YouTube video.
For box 2, I chose to use a YouTube video. I used the YouTube icon on the right to search "Minerals for Kids," selected & previewed a video, and then drug it over to box #2. I like to start with a video because I feel these get their attentions quickly.
3. Box 3: Google search for website.
For box #3, I used the Google icon on the right to search "Minerals for Kids" and selected "web" to search for information rather than images. I found a website with good information that I liked, clicked the link, and drug it to box #3.
4. Box 4: Website
For box #4, I used the website icon on the right to enter a link for a website I already knew that I wanted to use. Just copy & paste the link, hit enter, and then drag it to the box!
5. Box 5: Padlet
Padlet! Oh, how I love Padlet! I'm planning to do my next Technology Tidbit on padlet. In short, it's kind of like a virtual corkboard that is great for collaboration, discussion, and SO much more! So, I created a padlet (in like 30 seconds!), got the code for that board, and used the website icon on blendspace again to upload it. I used this padlet for students to just simply state one thing they learned about minerals. That way they can post something, and get to read what other students posted at the same time! Again, that should be my next tech post!
6. Box 6: Quiz time!
Last but not least, I created a quiz at the end. It was just a few simple multiple choice questions. It gives immediate feedback too!
Just type the question and answers, and then select the correct answer. Do this until you are done creating all the questions you want and hit submit.
Lastly- once I'm done making my Blendspace, I choose how I want to share it with my kids. There are several different options: sending a link, Edmodo, Twitter, embedding a code, email, Facebook, or my personal favorite- QR Code. Teaching elementary and having several iPad minis in my room, I LOVE QR Codes. I use the QR code for my blendspace, copy it into a word document, and print a couple out for my kids to use to quickly take them to the site!
Finished Product:
Here's my finished product & what my students see once they hit play! (This is the Paul Revere one shown at the beginning of this post.) The link to this Blendspace is below the image as well in case you want to see it in action! :)
I've really been trying to work on my TpT store this summer. I've tried sprucing products up, making them more eye-catching, and adding some new products. One thing I've decided I have wanted to start doing is consistently sending out monthly newsletters to my followers. I want it to include images of new products they may want to check out, tell them about my blog, and send a thank you to them for being a follower of my store! One way I've decided to thank my store followers is by sending out a monthly freebie! For the month of July, all my followers at the time received a link to a Google Doc. of my brand new Nonfiction Text Features Assessment: "Orcas."
So, I don't know about you, but for me it is SO easy to just click delete when I get new messages in my TpT inbox. I'll skim them, but if it doesn't quickly catch my eye, I don't give it much attention. I've noticed the messages that I take my time to really read are the ones that are "cutified." Okay, so I just made that word up, but it just had to be used! :) I didn't want my followers to do the same thing with my newsltters and miss out of on the monthly follwer freebie, so I decided I had to "cutify" my newsletter as well!
Now, I will first admit that I am still in the learning stages of how to do a lot of this stuff. Most of the time when I'm doing it, I have whatever I'm working on on one part of my computer screen and a tutorial on how to do it on the other side of the screen. Here's just a quick run down of what I did!
I started out in Power Point (my go-to for just about everything!). I inserted a cute background and frame first!
Then, I got to work. My newsletter consisted of 4 main parts. First, I wrote a general hello & thank you note. In the second section, I wrote about some of the new projects I was working on and even put the names and images of a couple of these. For this particular newsletter I wrote about some of the QR Code Task Cards I was working on, and then showcased 3 of them that were currently up in my store.
You can check out all my QR Code Task Cards in my TpT Store.
In the 3rd section of my newsletter, I wanted to focus on my Follower Freebie for that month! I wrote about that month's freebie, included an image, and a link for the Google Doc to download it.
And lastly, I also made sure to add my blog button to the bottom of my newsletter...just to kind of start branding my stuff and hopefully start directly people to check out my blog as well.
When I was done, this was what it looked like.
Then, I saved my power point as a png file. To do this, Click "Save As" and scroll through the "Save As Type" section until you get to PNG. Select it and click save. (The black bar was not on it. I just blacked out the link for the free download to keep that as a special treat for my store followers. :))
Then, I logged into my TpT Store and clicked the link to send a new message to followers. (I would include image step-by-steps of this next part, but I have a few weeks until TpT will let me compose another letter to my followers since we're restricted to just one per month).
When you are sending a note to your followers, there is an icon at the top of where you compose your letter that lets you insert a picture. Click this, and then upload your newsletter image! :) There should also be a button to link your image to a web address. Since I was focused on my follower freebie for the month, I linked my newsletter image to the Google Doc with my freebie!
Then, if you want to add any more links in your letter, you will need to just add it below your cutesy little newsletter. Sorry, this is so vague. It's difficult to describe when I can't go back and look at the step-by-step process. When I send my August newsletter out with my next Follower Freebie! I will try to take snapshots and update this post. For now, I hope this helps some! :)
I'm posting this blog link to share these wonderful instructions for customizing your TpT Store Quote Box, and so I can refer back to it when I want to change things up! This is awesome!
Just about everything we do has some sort of motivating factor behind it. When I listed my very first product on TpT, my thought was that I could possibly make a little extra money on the side selling stuff I was making anyway for my own class. Never could I have imagined that my store would grow the way it did, and even more so, I never would have imagined that I would grow the way I have. TpT has almost become a new form of professional development for me. I'm researching new strategies and activities to use in the classroom and make products for. I'm working on building my social network knowledge, and have learned so much just over the past few weeks in reading blogs of other incredible teachers out there.
This week's TpT Seller Challenge was Dare to Dream. What are my dreams for my Teachers Pay Teachers store? I'm a dreamer, so this definitely was not hard for me. So, here they are!
1. IVF- Payoff: While growing up, I went through an assortment of things that I was going to be when I grew up. It was an ever-changing list of doctor, fashion designer, teacher, etc. One thing that always stayed constant though was my desire to be a mom. I have always known that I wanted to have children and be a mommy. I have PCOS though, and that dream was not an easy thing to make a reality. It took us 3 years to have our first sweet baby girl. It only took us about a year to have our 2nd baby girl, but it was a tougher journey. To have baby #2 we had to undergo IVF. This was one of the most spiritually and emotionally challenging times of our lives. We were very blessed that this treatment worked though and now have a very spirited 2nd baby girl. With that, we also had about $20,000 of debt for all my treatments that I'd like to get paid off sooner rather than later.
Here are my two baby girls! Tenley just turned 5 last week, and Miss Beckett is almost 17 months! They are my heart!!!
Aren't they precious?! You can read more about my journey
with IVF on my personal blog: Choosing to Count. I need to start blogging there again soon! :)
2. Student Loans/Debt Free: Like almost every other post college graduate, I have oodles of student loans. I have my Bachelor's, Master's, and Specialist's and have loans for them all....I would LOVE to not be retired and still paying student loans! :) We also have some other debt from moving, and extra expenses from when things got tight (money wise) through IVF and moving. I'd love to have all debt other than our house and car loan paid off! :)
3. Networking: Another dream I have with doing the whole TpT thing is continued networking. Unfortunately, I have not been able to attend the TpT conference(s) (including the upcoming one in July). I hope to next year. I learn more and better myself so much more by working along phenomenal teachers than I could by any class or book.
4. Travel: If there is one thing I'm very passionate about, it's traveling. I rarely get to travel due to lack of funds, but I desperately want to be a world traveler. I believe that God made a big, beautiful world, and I want to see it all! A few travel wishes on the top of my list include: an African Safari, Italy, Greece (I want to see where all my ancestors are from), London, Paris, and Australia! I'm hoping and dreaming that'll all happen one day! :)
5. Bless Others as I have been blessed: Last, but certainly not least, I want to be able to bless others as I have been richly blessed. I don't know what all God has in store for my family, but I want us to always be faithful and willing to do whatever He brings our way, including giving back.
One of my goals this summer included putting some major work into my TpT store and my blog. I gave myself some down time for the first week or two of summer break, and then decided it was time to get some work done! A few fellow TpT Sellers started something called the TpT Seller Challenge, which turned out to be just the motivation I needed to get started. This challenge will last four weeks, with each week containing a different challenge for sellers. The Week 1 Challenge is "Makeover Madness." The goal is to make over something in your store...an old product, a product cover, etc. There are several products I'd like to overhaul, but I spent a lot of my time instead revamping my store "button," my store banner, working on my Facebook page, and revamping my blog. I think in the fall I am going to bite the bullet and hire a blog designer, but I wanted to make my blog look as decent as possible until then. I even updated the few pages that I put at the end of each of my products with thank yous/links, credits, etc.
Here are some of my befores and afters! :)
Store Button:
Facebook Banner:
End of My Pack Pages:
I'm off to a pretty good start! Now, I'm trying to go back through my 200+ products to change these back pages! Yay! :) #tptsellerchallenge
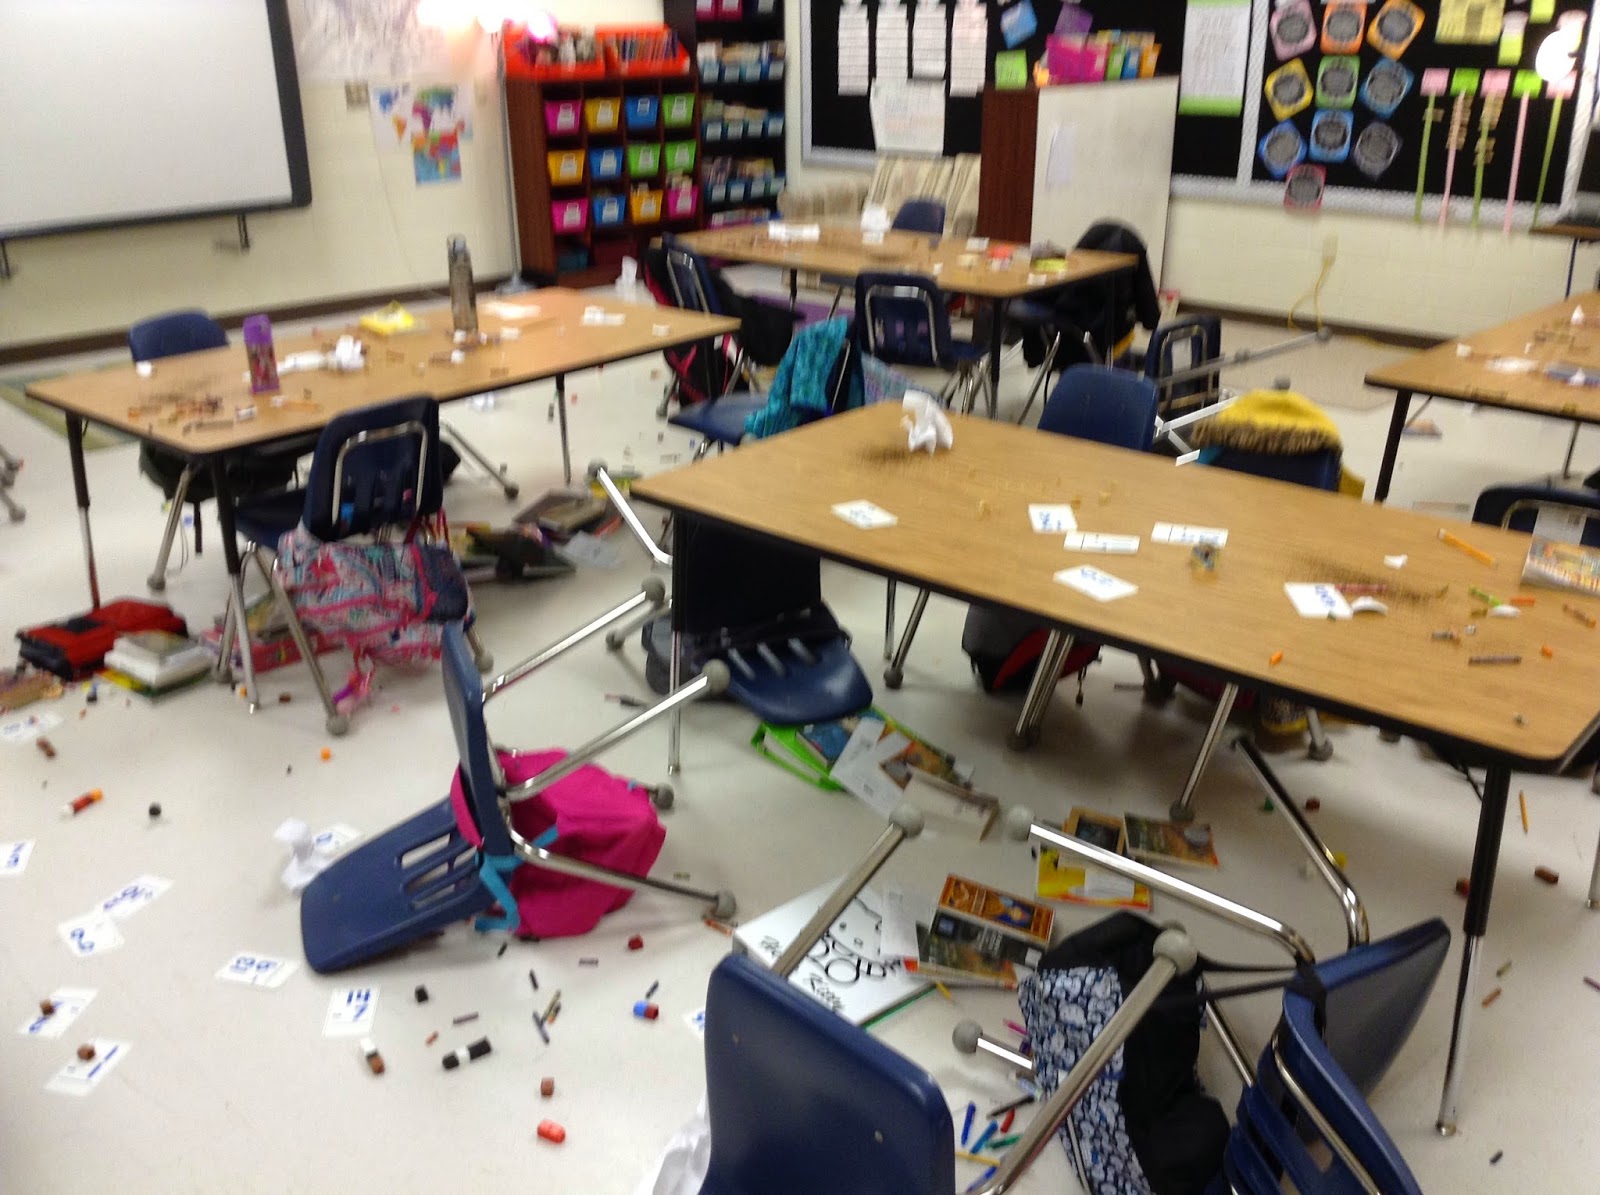
I have a wonderful team that is overflowing with amazing teaching ideas! One that I did, but cannot take credit for coming up with, is polluting my classroom to help introduce pollution. After dropping my kids off at lunch, I came back and began to trash my room....if you know me at all, you will know that I am not a neat freak by any means, but in my work space, I can't handle a mess for the sake of a mess, so this was hard....I could feel my chest tightening up as I was spreading trash around my room and knocking over chairs (not really...but I like the dramatics of it).
After the trashing, I had just about enough time to heat my lunch up and take all of 1 bite of it before picking my kiddos up. I didn't really care though because I was so excited to see their reactions. We came back to the room, they expressed their surprise, and then expressed their displeasure when I told them they now had to clean it up. :)
It took them 15 minutes to get everything spic and span and back in place! They didn't think that was too bad. I explained that it only took me, 1 person, 10 minutes to make the big mess, and it took them 15 minutes X 20 people, which equated to 300 minutes, or 5 hours to clean it all up. I asked them to think about that in terms of our environment and all the people that pollute it.
After that we watched a 3 minute clip that showed some of the devastating effects of pollution. I had them discuss at their tables the following questions:
1. What is pollution?
2. Why is it bad?
3. What are different types of pollution?
4. What can we do to help?
We talked about what they discussed and then read and completed a Pollution and Conservation Mini-book.
To get this mini-book visit my TpT store by clicking here.
This lesson was definitely one of my favorites from this year! Students were immediately hooked (for all you Pirates out there! :) )and excited to learn more! #tlap
For the past couple years I have dabbled in the blogging world. I know how to type a blog post, but would not consider myself a true blogger! I haven't been consistent, I don't know all the blog terms, I don't know how to link up with other bloggers....basically, I just know the very very basics. One of my goals this summer has been to change that! I have been watching videos, collaborating with other bloggers, and reading articles to learn more about the blogging world and hopefully get better at this!
So, my class has been working on nonfiction text structure for the last 2 1/2 weeks. I started my unit off by reviewing genres--nonfiction specifically, and nonfiction text features. I then talked about how author's also use different text structures when writing. I introduced the following text structures, and we completed the anchor chart below:
We also discussed compare/contrast, but created a page just for that one....partly because I think that one is particularly important and requires slightly more discussion/practice, and partly because I ran out of room on the first chart. :) I got this idea from http://www.teachingwithamountainview.com/
After introducing all the different text structures, we then spent the next two weeks looking at each individual text structure and doing some practice with them. Now, we're back to reviewing them altogether. I also bought some wonderful task cards from Teaching with a Mountain View--love her stuff! We took one of the text cards, which has 3 different passages all on the same topic, and questions. Together, we read each passage and determined which text structure was used, and gave evidence to support our choices. Then, we answered the questions included. See below.
The following day, I let them get in groups to do the same thing. Initially I made a list of the groups I was going to put them in, but then as we were getting ready to start, I decided to change things up! I wanted them to be truly engaged and for this to be a meaningful activity. I went over the different topics they were going to choose from, and then called them out one at a time to see who wanted to do what. It worked out perfectly where they all ended up in groups of 2-3. Here they are working away!
We worked for about 35 minutes today, and are hoping to finish up tomorrow!


.JPG)